SWIFT SDK for iOS
This guide outlines the quick installation procedure for the Novalnet SDK for iOS applications, enabling you to start accepting payments worldwide. For this integration, a Novalnet merchant account is required to accept Novalnet payments. Please ensure that you have received your merchant account details from our sales team. If not, drop an email to sales@novalnet.de.
To get started
- Log in to the Novalnet Admin Portal with your merchant account details (user credentials).
- Technical documentation - https://sandboxdeveloper.novalnet.com/api-reference
- Make sure that you have extracted the iOS SDK package from the zip file you have received.
- iOS Deployment Target: 16.6 & above
- Xcode: 16.4
Supported Payment Methods
- SEPA Direct Debit
- Direct Debit ACH
- Credit/Debit Cards
- Invoice
- Prepayment
- iDEAL | Wero
- Przelewy24
- eps
- MB Way
- PostFinance
- Bancontact
- Online Bank Transfer
- WeChatPay
- Trustly
- Blik
- Payconiq
- Naver Pay
- TWINT
- Kakaopay
iOS-Swift SDK Integration
To integrate the Novalnet SDK, follow the steps below.
Step 1: Download the NovalnetSDK.xcframework.zip and unzip the package.
Step 2: Open Xcode IDE and target your iOS app
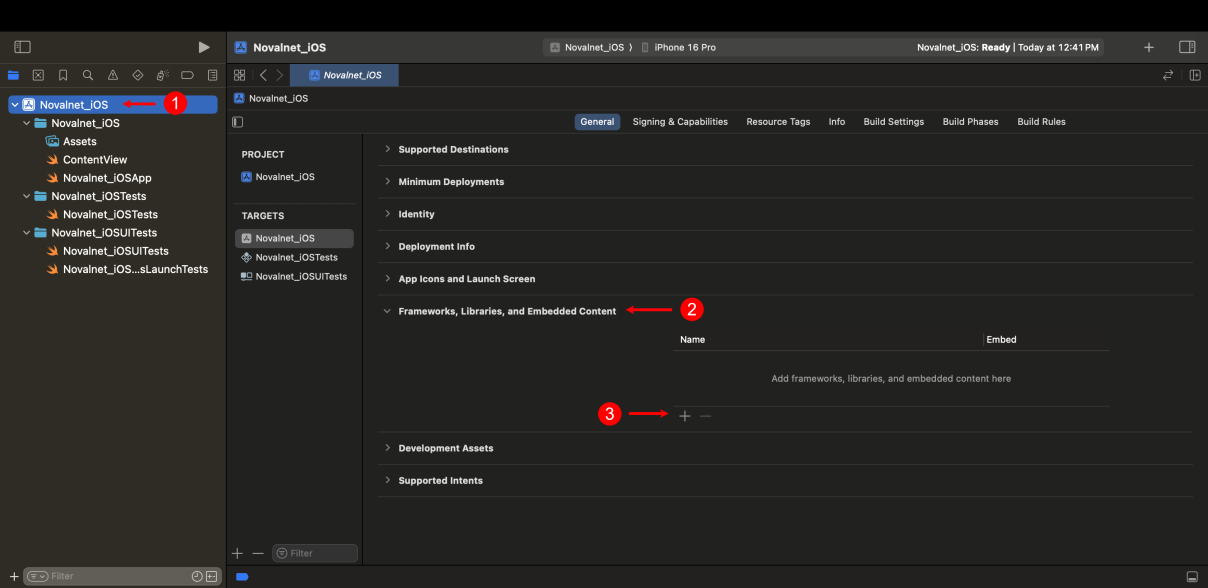
Step 3: To add the Novalnet iOS framework, navigate to the app name, e.g., Novalnet_iOS → Frameworks, Libraries, and Embedded Content. Click icon as shown below
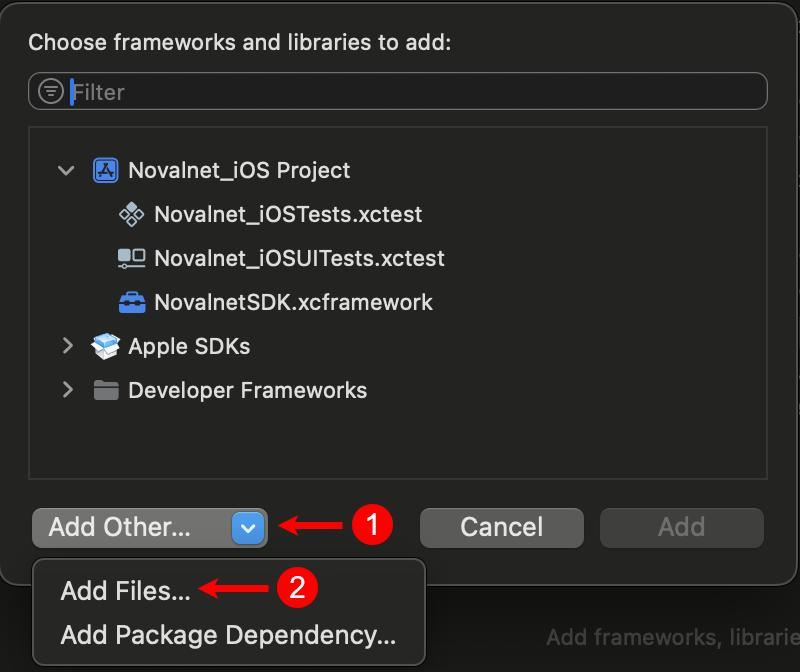
Step 4: To add a Novalnet framework, navigate to Add Other → Add Files… as shown below
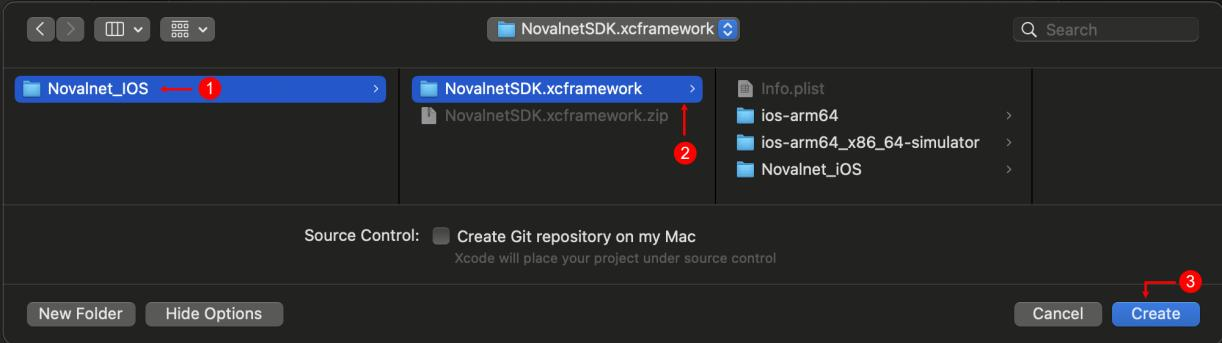
Step 5: Navigate to the extracted package NovalnetSDK.xcframework and click Create, as shown below
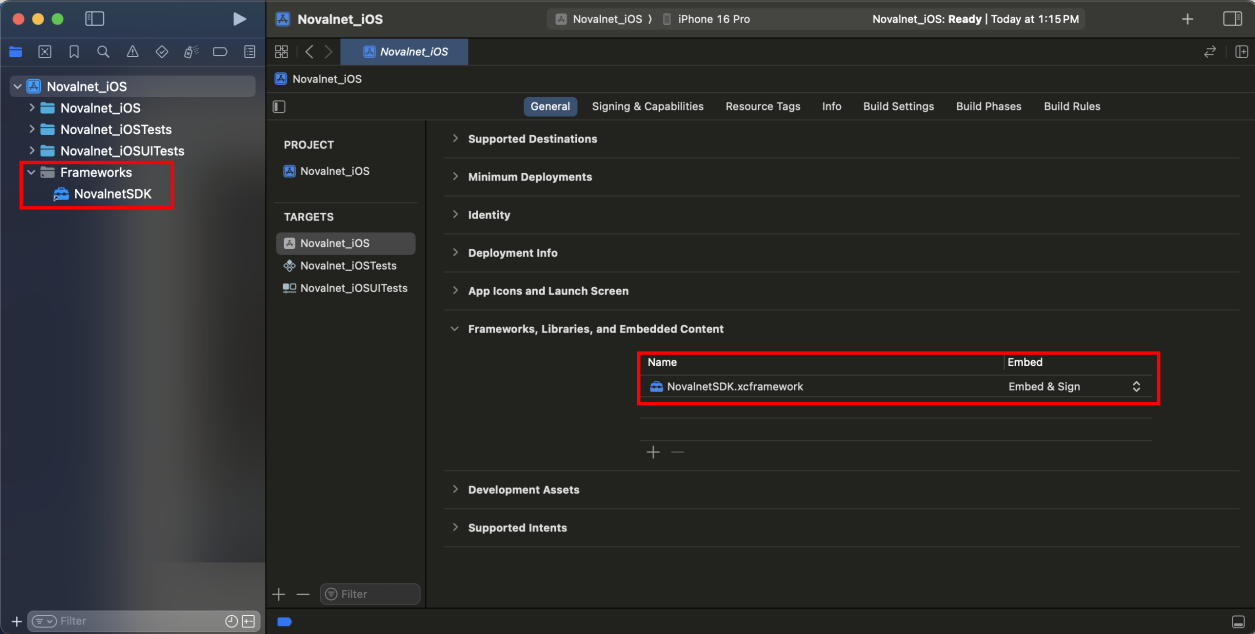
Step 6: The Novalnet framework will be added to your app and set Embed & Sign as shown below
Step 7: After integrating the framework into your app, proceed to prepare the payments.
[
    "signature": "###YOUR_API_KEY_SIGNATURE###",
    "access_key": "###YOUR_PAYMENT_ACCESS_KEY###",
    "tariff": "###YOUR_TARIFF_ID###",
    "first_name": "###CUSTOMER_FIRST_NAME###",
    "last_name": "###CUSTOMER_LAST_NAME###",
    "email": "###CUSTOMER_E-MAIL###",
    "customer_no": "###CUSTOMER_NO###",
    "tel": "###CUSTOMER_TELEPHONE_NO###",
    "billing": [
        "city": "###CUSTOMER_CITY###",
        "country_code": "###CUSTOMER_COUNTRY_CODE (e.g: DE)###",
        "house_no": "###CUSTOMER_HOUSE_NO",
        "street": "###CUSTOMER_STREET###",
        "zip": "###CUSTOMER_ZIP_CODE###"
    ],
    "shipping": [
        "city": "###CUSTOMER_CITY###",
        "country_code": "###CUSTOMER_COUNTRY_CODE (e.g: DE)###",
        "house_no": "###CUSTOMER_HOUSE_NO",
        "street": "###CUSTOMER_STREET###",
        "zip": "###CUSTOMER_ZIP_CODE###"
    ],
    "test_mode": "###TEST_MODE###",
    "amount": "###TRANSACTION_AMOUNT###",
    "order_no": "###ORDER_NO###",
    "currency": "###CURRENCY###",
    "return_url": "myapp-scheme://payment-redirect",
    "error_return_url": "myapp-scheme://payment-redirect",
    "payment_action": "payment/authorize",
    "enforce_3d": "0",
    "due_date": "###DUE_DATE###",
    "lang": "###STORE_LANGUAGE###"
]
Payment Action
payment - where transactions are directly confirmed, and funds are automatically transferred from the buyer’s account to the merchant account. This can be changed as per your business requirements.
authorize - Payment details are verified while the funds are reserved, which will be captured later.
Step 8: Import the following packages in your app
- Import NovalnetSDK
- Import SafariServices
- Import CryptoKit
import SwiftUI
import Novalnet_SDK_framework
import SafariServices
import CryptoKit

struct ContentView: View {
    @State private var message: String = ""

    var body: some View {
        VStack {
            let body: [String: Any] = [
                "signature": "###YOUR_API_KEY_SIGNATURE###",
                "access_key": "###YOUR_PAYMENT_ACCESS_KEY###",
                "tariff": "###YOUR_TARIFF_ID###",
                "first_name": "###CUSTOMER_FIRST_NAME###",
                "last_name": "###CUSTOMER_LAST_NAME###",
                "email": "###CUSTOMER_E-MAIL###",
                "customer_no": "###CUSTOMER_NO###",
                "tel": "###CUSTOMER_TELEPHONE_NO###",
                "billing": [
                    "city": "###CUSTOMER_CITY###",
                    "country_code": "###CUSTOMER_COUNTRY_CODE (e.g: DE)###",
                    "house_no": "###CUSTOMER_HOUSE_NO",
                    "street": "###CUSTOMER_STREET###",
                    "zip": "###CUSTOMER_ZIP_CODE###"
                ],
                "shipping": [
                    "city": "###CUSTOMER_CITY###",
                    "country_code": "###CUSTOMER_COUNTRY_CODE (e.g: DE)###",
                    "house_no": "###CUSTOMER_HOUSE_NO",
                    "street": "###CUSTOMER_STREET###",
                    "zip": "###CUSTOMER_ZIP_CODE###"
                ],
                "test_mode": "###TEST_MODE###",
                "amount": "###TRANSACTION_AMOUNT###",
                "order_no": "###ORDER_NO###",
                "currency": "###CURRENCY###",
                "return_url": "myapp-scheme://payment-redirect",
                "error_return_url": "myapp-scheme://payment-redirect",
                "payment_action": "payment/authorize",
                "enforce_3d": "0",
                "due_date": "###DUE_DATE###",
                "lang": "###STORE_LANGUAGE###"
            ]

            // Show Novalnet Payment View
            Novalnetsdk.PaymentIntegrationListView(body: body) { result in
                switch result {
                case .success(let response):
                    print("Payment Success: \(response.tid) - \(response.status)")
                    message = "Payment Success: \(response.tid)"
                case .failure(let error):
                    print("Payment Failed: \(error.description)")
                    message = "Payment Failed: \(error.description)"
                }
            }
            .navigationTitle("Payment Methods")
            .navigationBarTitleDisplayMode(.inline)

            // Display payment result message
            Text(message)
                .foregroundColor(.blue)
                .padding()
        }
    }
}

#Preview {
    ContentView()
}
Handling Redirect Payments
Handling the redirection-based payments using URL schemes for success and failure.
Refer this URL for Custom URL Scheme.
Merchants must define a custom URL scheme in their app (only alphanumeric and the '-' character is supported).
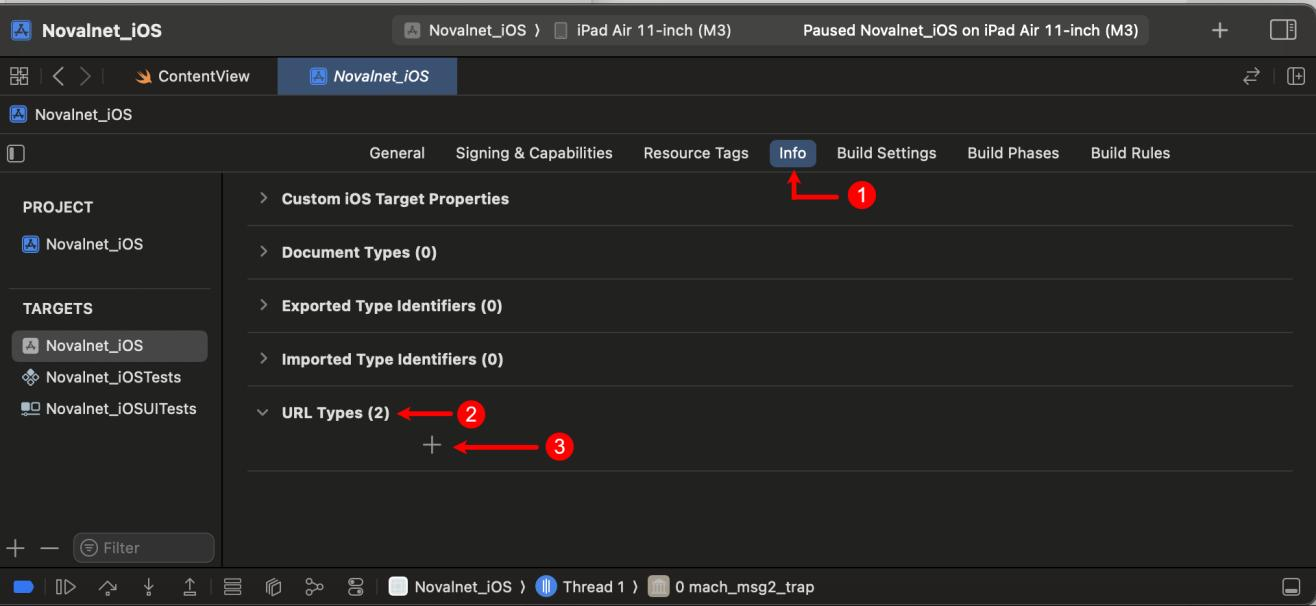
Step 1: To define a custom URL scheme, navigate to Info → URL Types and click icon as shown below
Step 2: Enter the Identifier and URL Schemes for custom creation as shown below
The identifier and URL scheme shown in the picture are just for example purposes.
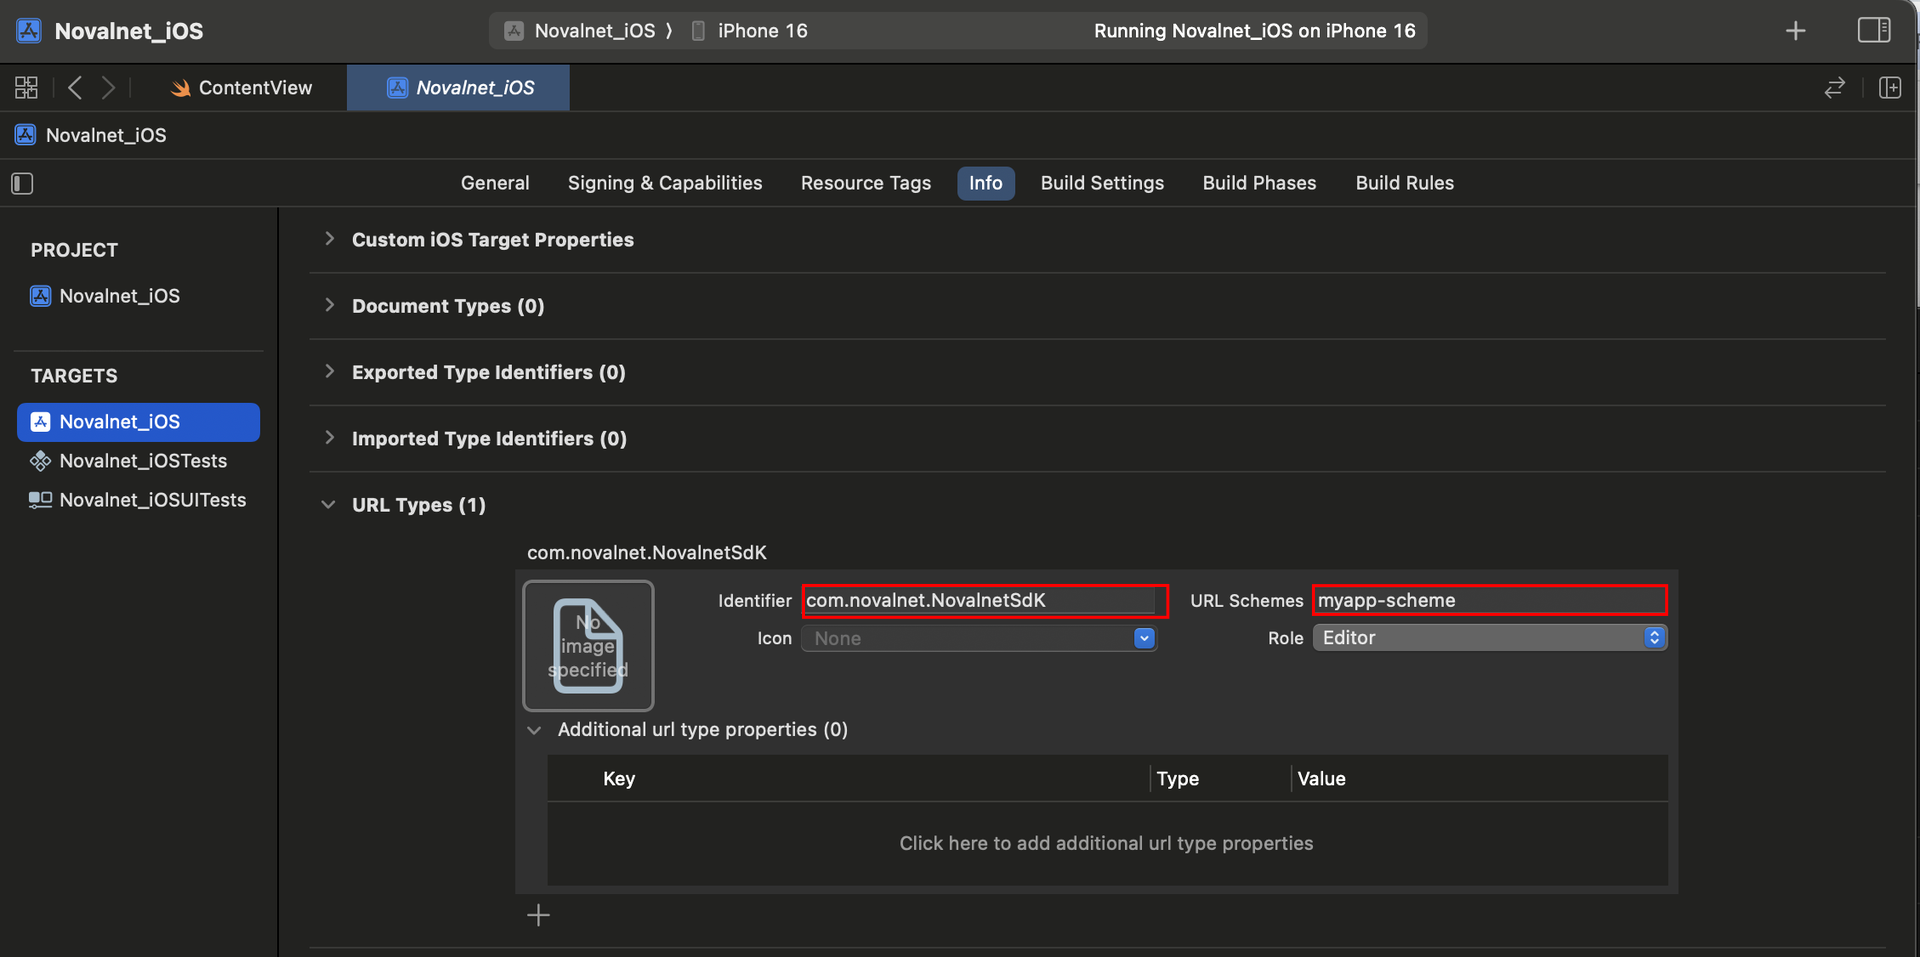
Example: Redirect URL Scheme for Setting Return and Error Return URLs : myapp-scheme://payment-redirect
Technical Support Through Novalnet
For any questions or further enquiries, please contact one of the following departments as per your requirement. Our in-house experts are ready to assist you in case of queries or issues.
If you have any installation assistance, recommendations, or suggestions for improvement, kindly share your thoughts with us to develop our iOS SDK further at technic@novalnet.de or call us at +49 89 9230683-19.
For our License details, see for Freeware License Agreement.